Latest Projects

It has been a while since I have taken any time to blog, but I wanted to show you the latest projects I have been up to.

IMG_2493 IMG_2495

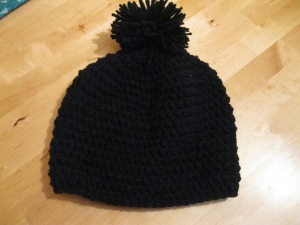
I made two of these hats for two girls in my church.  They are fast and the sizes chart in the post is great.  Check out this blog for the pattern.

IMG_2497

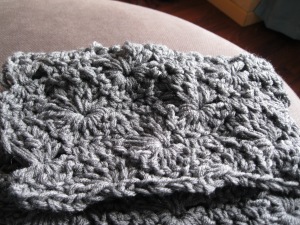
This scarf is really versatile, I didn’t take pictures of all the different ways it can be worn, check out this blog for the pattern.

IMG_2538

This isn’t finished yet because I need more yarn, but my friend is coming in a couple of weeks and she will bring me some. I am anxious to wear it, because it is so pretty.  It is a little complicated at first, but it gets easier as you go.  Another great blog with free patterns. Can I just say how thankful I am that people are willing to share their crochet patters for free!  What a blessing!

IMG_2536

Pinterest is great.  I found this post about growing your own garlic.  I am skeptical, we will see if it works.  If you try it, post a comment and let me know if it works.  Here is the beginning of mine, It has grown about 2 inches since I took this pic. I will post on this later as it grows.  We will if it is a pinsuccess or a pinfail.

IMG_2509

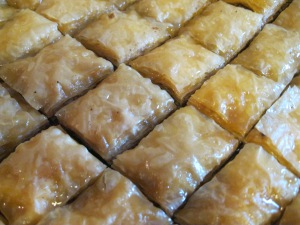
I also made Turkish Baklava, it was really good.  I will be doing a full blog post on this.

So as you can see I haven’t been blogging, but I certainly have been baking, crocheting and pinning!

Gooey Butter Cookies

Three years ago I was in St. Louis for Urbana 2009.  We asked the concierge at the hotel where we could go for a quick lunch. She suggested a Whole Foods type grocery store.  She added, “Try the Gooey Butter Cookies, you will come back and thank me!” She was right I went back and thanked her!  I know Paula Dean makes varieties of Gooey Butter Cake and that is good, but the cookies is where it is at!

Before you start your New Year’s Resolutions to lose weight, make sure you make these cookies for your parties this week, actually they are good through out the year.

I don’t know where I found this recipe three years ago, so I am sorry I can’t give credit where it is due!

Gooey Butter Cookies

1 (8 oz) package cream cheese

1/2 cup butter (softened)

1 egg

1/4 tsp vanilla

1 (18.25 oz) package yellow cake mix (I always use Pillsbury)

Confectioner’s Sugar for rolling

– Cream together the cream cheese and butter until smooth.

– add egg, vanilla and cake mix

– Roll batter into balls and roll in confectioner’s sugar

– Bake at 350 for 8-10 min (Don’t over bake)

IMG_2477

IMG_2478

IMG_2479

If you are anything like me your kitchen will probably look like it snowed.

Happy Baking!

Everybody’s Favorite Cookies

The tree is decorated, itunes is playing my favorite Christmas songs and the fire is blazing (okay, I don’t really have a fireplace, but I wish I did), what else is there to do but make some cookies.

A couple of years ago I found a recipe in Taste of Home magazine that used chocolate cake mix and thin mint cookies.  I thought they sounded pretty good so I went to get the ingredients.  When I was at the store, I couldn’t find any thin mint type cookies, so I opted for York Peppermint Patties.  Sounded good to me!  Thus I created “Everyone’s favorite Cookies.” My nephew loves these cookies so for a long time we called them Ben’s Favorite Cookies until my sister declared that they weren’t just Ben’s favorite, but everyone’s favorite.

Here is what you will need. Devil’s Food Cake Mix, 2 eggs, 1/2 cup butter (s0ft), 1 TBS water and confectioner’s sugar for rolling

ebf cookie (1)

Mix water, softened butter and cake mix together with a mixer.  Add egg and a little vanilla if desired.

ebf cookie (2)

My parent’s brought me my Kitchen Aid, I am so happy.

ebf cookie (3)

Roll into balls, the smaller you roll them the more you will get.

ebf cookie (4)

Roll in Powered Sugar

ebf cookie (5)

Bake at 350 for about 8 mins.  Honestly it is hard to tell when they are done, don’t over bake them.  Less is more with these cookies.

ebf cookie (6)

Make sure you have your peppermint patties ready!

ebf cookie (7)

When they come out of the oven push a patty into each one.

ebf cookie (8)

Seriously how could these be bad?

Merry Christmas and Happy Baking!


Fete de Lumiere

Every year Lyon, France has a festival to celebrate Mary saving Lyon from the plague (you can see more info here).  My parents came this year so that we could enjoy the lights.  I am not a professional photographer on any level but here are some of my pics.  Enjoy!

Mom and Dad visit my pics (49)

Mom and Dad visit my pics (53) Mom and Dad visit my pics (58)

Mom and Dad visit my pics (40)

Mom and Dad visit my pics (80) Mom and Dad visit my pics (83)

St. Jean is the church above, there was about a 15 min light show there. It was so cool!

Hope you enjoyed a few of my favorite pics from the Fete de Lumiere!

Scarf Swap

I was introduced to this blog by a friend summer.  Having a heart for adoption and since I love a good blog I started reading Karen’s blog often (you should too!).  When she proposed a scarf swap I was all in!

My scarf swap partner is named Karen too.  She also has a heart for adoption and you can see her great blog here.

After exchanging a few emails with Karen, I couldn’t wait to swap scarfs.  I made and sent her a scarf that looked like this only grey.  Here is what she sent me…

Yeah a package in the mail!

Pretty wrapping…

I was so excited to open it up… Voila a beautiful teal scarf and chocolate!

And as a language learner, I have to give mad props to anyone learning this language!

Yeah!  I love my scarf!

Become a Better Baker, tips and tricks…

Since I went to culinary school, people often ask me if I have any tips on how to be a better baker.  Here are some of my tips that separate a good baker from a great baker.

1. Follow the recipe: This sounds basic, but I would say this is the number one thing that people don’t do correctly.  You are baking, not cooking, when you cook you can play with the recipe, when you bake follow the directions.  And not just the ingredient measurements it is also the instructions.  There is a reason you are supposed to cream the sugar and butter before adding the flour.  Follow the instructions!

2. Under-bake things: I claim to have a sixth sense that I know when the things I am baking are done.  The only time this doesn’t work is with the last batch of cookies (anyone with me?).  Brownies, cookies, cookie bars, should be under baked. They are better that way.  Cakes and pies should not be under-baked, however cakes should be taken out the second they are done.  Under-baking some of your items will mean that your baked goods are more moist and tender.

3. Liquid and dry measures:  Remember in Jr. High Home-ec class when you learned the difference between a wet and dry measuring cup?  There IS a difference.  Don’t use a wet measuring cup to measure flour our sugar, you won’t get a nice even measurement.  A dry measuring cup wasn’t meant to measure wet ingredients, you will spill and have a mess.  A dry cup is a little less than a wet cup measure.  So use the proper measuring cup for the job.

4. Saran Wrap is your best friend: In professional kitchen there are always large film wrap.  They wrap everything,  A LOT!  As soon as your items are cool wrap them up well.  That means over and under.  This goes for cakes, pans of brownies and breads.  If you are going to freeze something, wrap it over and under 4 times.  Also I will often freeze something the same day I make it.  When I get it out of the freezer it tastes as fresh as the day I made it, because it was properly wrapped.

5. Aluminum foil is NOT the same:  People seem to easily confuse Aluminum foil for film wrap, this drive me CRAZY!  Seriously, aluminum foil is for the oven.  Don’t use aluminum foil to keep your items fresh.  It doesn’t work and might leave a funny taste on your items.

6. Cakes, cookies and brownies, DON’T belong in the fridge:  This drive me a little less crazy than aluminum foil.  Cakes, cookies and brownies have no need to be chilled.  The fridge doesn’t keep them fresh.  The only reason a dessert needs to be in the fridge is if it is filled with an egg or milk based filling. (Butter doesn’t need to be refrigerated.)  One time I found a plate of brownies and cookies in the fridge covered with aluminum foil, I almost lost my mind!

Some of these things may seem a little too too, but like I said this separates the good from the best!  Anyone have a tip to add?

Happy Baking!

Nutella Dream aka. Nutella Stuffed Chocolate Chip Cookies

If you have visited or lived in Europe you know what Nutella is!  I know it is advertised in the US too.  They make it look like it is good for you because it is milk and nuts!  We all know it really isn’t that good for us.  One time when eating Nutella on bread for breakfast someone asked me, “would you put icing on bread and eat it?” Well maybe, but I got the drift.  These cookies are pure indulgence!  Delicious! I have seen this recipe around, I modified it a bit and have step by step pictures to help you out.

Nutella-Stuffed Browned Butter Chocolate Chip Cookies adapted from Ambitious Kitchen.  

2¼ cup all-purpose flour

1¼ teaspoons baking soda

1 teaspoon of salt

2 sticks (1 cup) unsalted butter

1¼ cup packed brown sugar

¼ cup granulated sugar

2 large eggs

1½ teaspoons vanilla extract

1 cup milk chocolate chips

1 cup dark chocolate chips

1 jar of Nutella, chilled in refrigerator

  1. Whisk together the flour, baking soda, and salt in a bowl and set aside. Melt butter in a saucepan over medium heat. The butter will begin to foam. Make sure you whisk consistently during this process. After a couple of minutes, the butter will begin to brown on the bottom of the saucepan; continue to whisk and remove from heat as soon as the butter begins to brown and give off a nutty aroma. Immediately transfer the butter to a bowl to prevent burning. Set aside to cool for a few minutes.
  2. With an electric mixer, mix the butter and sugars until thoroughly blended. Beat in the egg, yolk, vanilla until combined. Add the dry ingredients slowly and beat on low-speed just until combined. Gently fold in all of the chocolate chips.
  3. Chill your dough for about 2 hours in the refrigerator.
  4. Preheat the oven to 350 degrees F. Once dough is chilled measure about 1½ tablespoons of dough and roll into a ball. Flatten the dough ball very thinly into the palm of your hand. Place 1 teaspoon of chilled nutella in the middle and fold dough around it; gently roll into a ball — it doesn’t have to be perfectly rolled! Make sure that the nutella is not seeping out of the dough. Add more dough if necessary. Place dough balls on cookie sheet, 2 inches apart and flatten with your hand VERY gently. (Really only the tops need to be flattened a bit!)
  5. Bake the cookies 9-11 minutes or until the edges of the cookies begin to turn golden brown. They will look a bit underdone in the middle, but will continue to cook once out of the oven.  Remove the cooled cookies from the baking sheets after a few minutes and transfer to a wire rack to cool completely. Repeat with remaining dough.

So you maybe thinking what it the world is brown butter and do I really need it?  I liked the description in the instructions that Ambitious Kitchen has, however I thought this would happen quickly, but it took a good 15 mins.

Here is the finished butter, a little weird right.  Yes, you could skip this step, but the cookies will be missing some of their flavor.

I decided while the dough was chilling to scoop nutella balls and I think this worked well.  I used my tsp measure.  Here is how they turned out. I also refrigerated these, which made shaping the cookies much easier!

Shaping the cookies isn’t hard, don’t let this part intimidate you.

Step one: Flatten out some cookie dough in your hand.

Step two: Place Nutella ball in center

Step three: Wrap dough around Nutella leave no Nutella exposed

Bake and enjoy with a tall glass of milk! Nutella DREAM!


No-Roll Pie Crust

Raise your hand if you hate rolling out pie crust!  I know I do!  It makes and MESS and then you have to move the crust to the pie plate and it always rips.  A lot of work for something that is just going to hold my filling and let’s face it, the filling is the real star of any pie.  So here is my solution, no-roll pie crust.  Trust me you NEED this for Thanksgiving.  It is flaky, and has just the right combo of sweet and salty!

Recipe:

1 1/2 cups Flour

1 Tbs. Sugar

1 tps. Salt

1/2 cup Oil (yes, oil, don’t use olive.  Use vegetable or sunflower oil)

2 Tbs. Milk

Combine flour, sugar and salt directly in pie plate, mix together with fork.  Mix together milk and oil and pour into pan.  Mix together and when the ingredients are mixed and form a dough, press the dough out with fingers, push it up the sides.  Crimp edges.

If you need to pre-bake your pie crust, preheat oven to 350 degrees and fill pie plate with wax paper and pie weights, bake about 20 mins until golden brown.

Here are some pictures to show the process.

Everything in pie plate.

This is what it looks like when it is ready to be pressed out.

Press out from center to sides…

Finished, forgive my pie plate they don’t have “normal” American pie plates here.

Oh and what happens if you want crust on top, well that is a little harder.  I have mixed up this recipe in a bowl and pieced it together on the top.  It wasn’t pretty, but it sure did taste good!


Jean Rag Rug

I saw some pictures of Rag Rugs (try to say that five times fast) on Pinterest and I was intrigued.  I thought it would be really fun to have a colorful rag rug of my own.  Then I found this blog with a tutoral about how to cut the fabric and that really got me thinking.  So I decided I wanted to use old jeans to make my own rug.  I figured that the fabric would be sturdy and the colors would basically match.  So I started collecting old jeans from friends, etc. and got started.

Cutting/Ripping the fabric takes a little bit of time, but it isn’t hard.  I suggest doing it outside, especially if you have a heavy fabric like jeans.

Next get a big metal crochet needle and get started.  Really use a metal needle my plastic needle broke pretty quickly.

Did I mention you need a lot of Jeans.  This picture shows about 2 pairs of jeans.  You can use kids jeans too, but they won’t get you very far.
Since she does such a good job of explaining how to cut the fabric and a simple pattern to get started, I won’t repeat.

And here is the almost finished project.

It is not as big as I want it to be, and I still have some jeans to add to it.  It has really become a prayer rug. When I see it I think and pray for the people who gave me their old jeans and are now serving the Lord all around the world!  Thank you friends!

The Great Pumpkin Puree Experiment

As you read this blog there are a couple of important things you need to know about me.  The first is that I live in France and it is hard to find some of the “normal” things you find in America.  That is why I decided to make pumpkin puree.  It is impossible to find pumpkin in a can here.  I will take a can of Libby’s pumpkin any day but sometimes it just isn’t possible.  The other thing that is important to know is that I went to Culinary School for Baking and Pastry Arts.  Don’t let that intimidate you.  It is just to point out that yes I went to culinary school and no I have never made or used fresh pumpkin in my baking.  Shocking for some I know!

I found this Pioneer Woman recipe for pumpkin puree and decided to go for it.

Anyway here is some of what I learned.

1. My pumpkin took longer than the recipe said, so be patient. Here is a picture of my pumpkin ready for the oven.

2. Blend, blend and then blend some more…

I used a blender because it was my only choice and the recipe I used suggests a food processor.  I added a little bit of water but still had trouble getting it to blend.  So don’t add too much water, but don’t give up easily either.


3. Use a strainer.  My family has an infamous story of stringy pumpkin pie.  Basically when my Dad was a young pastor he and my mom went to a families house for dinner, the lady served pumpkin pie for dessert and it was stringy and not smooth.  Both of my parents had to choke the pie down and I think my mom swore off fresh pumpkin puree from that moment on.

I am so glad I did this, as you can see below it wasn’t easy to get the blended pumpkin through the strainer, I got rid of lots of stringy pieces and have a smooth puree.  I would recommend using a ricer, but I don’t have one.

I ended up with the equivalent of a can and a half of pumpkin, and a lot of dishes to do.  When I posted on Facebook that I was making pumpkin puree for the first time a lot of my friends told me that I wouldn’t be disappointed.  I am not convinced yet the proof will be in the pudding so to speak.  I will have to use the actual puree in baking to know if I like it or not. I will keep you posted how that goes!